Related Resources: manufacturing
Preferred Mechanical Tolerances Metric ISO 286
Mechanical Tolerance Chart Data
The following defines the preferred tolerance basis for hole and shaft per. ISO 286.
- Open ISO 286 Table of Hole & Bore Tolerances Calculator
- Open ISO 286 Table of Shaft Tolerances Calculator
- General ISO Geometrical Tolerances Per. ISO 2768
|
Hole Basis |
Shaft Basis | Type of Fit | Description |
| H11/c11 | C11/h11 |
Clearance Fit
|
Loose running fit for wide commercial tolerances or allowances on external members. |
|
H9/d9
|
D9/h9
|
Free running fit not for use where accuracy is essential, but good for large temperature variations, high running speeds, or heavy journal pressures. | |
|
H8/f7
|
F8/h7
|
Close Running fit for running on accurate machines and for accurate moderate speeds and journal pressures. | |
|
H7/g6
|
G7/h6
|
Sliding fit not intended to run freely, but to move and turn freely and locate accurately. | |
|
H7/h6
|
H7/h6
|
Locational clearance fit provides snug fit for locating stationary parts; but can be freely assembled and disassembled. | |
|
H7/k6
|
K7/h6
|
Transition Fit
|
Locational transition fit for accurate location, a compromise between clearance and interferance. |
|
H7/n6
|
N7/h6
|
Locational transition fit for more accurate location where greater interferance is permissible. | |
|
H7/p6a
|
P7/h6
|
Interferance Fits
|
Locational interference fit for parts requiring rigidity and alignment with prime accuracy of location but without special bore pressure requirements. |
|
H7/s6
|
S7/h6
|
Medium drive fit for ordinary steel parts or shrink fits on light sections, the tightest fit usable with cast iron. | |
|
H7/u6
|
U7/h6
|
Force fit suitable for parts which can be highly stressed or for shrink fits where the heavy pressing forces required are impractical. |

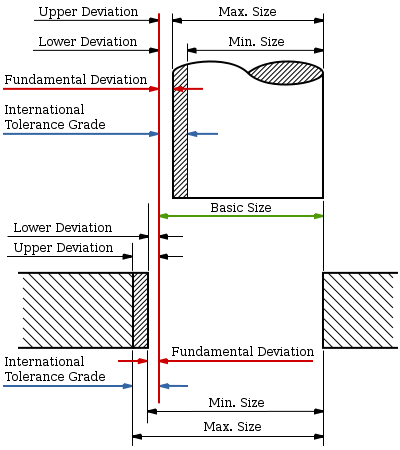
Illustration of Tolerance Boundaries

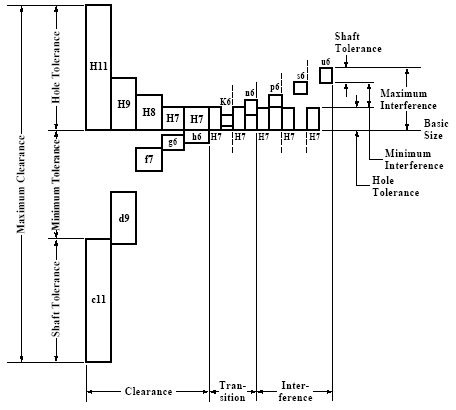
Preferred Fits Hole Basis

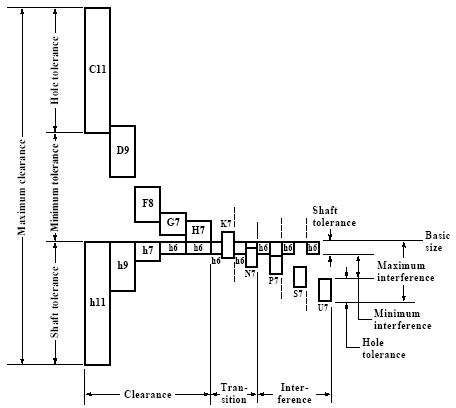
Preferred Fit Shaft Basis
Related Resources:
- Gage Tolerance Calculator ASME B89.1.5 Pin and Ring Gauges
- ISO Tolerances For Fasteners
- Gauge Blocks Tolerances Specifications Table DIN 861
- General Tolerances Shaft - Holes Fits
- GD&T Geometric Dimensioning Tolerancing Basics Training
- GD&T Geometric Dimensioning Tolerancing Intermediate Training
- GDT ASME Y14.5-2009 Applications Training
- G&T Geometric Tolerancing ISO 1101 Training
- Online GD&T Fundamentals Training